How to Magnetize a Screwdriver?
The first thing you need to do after purchasing a screwdriver is of course checking if it’s magnetized or not. A magnetized one is much comfortable to use because the screws will stick to it and you can take them out easily. You can use it as a pickup tool to pick dropped nuts or bolts. You can also use it to fish out any small metallic thing from almost everywhere. As you see it’s very comfortable thing.
Checking a Screwdriver
It’s very easy to check if the tool you have purchased is magnetized: just take a small screw and touch it with it. If the screw sticks to it then everything is OK and you can use it. But if it can’t take off the screw you have a problem.
In this guide, I am going to tell you how to magnetize a screwdriver at home. There are 3 ways of doing this: with a magnet (the simplest way), with a battery (a little bit more complicated), with a special magnetizer.
Both methods are easy, fast and give the same result. The difference between them is extra equipment that is required. If you don’t have a magnet you can go with a battery method. Use the things you have in your garage.
PAY ATTENTION: If your screwdriver is made of Titanium you will not be able to magnetize it or the effectiveness will be very low! That’s because of physical properties of titanium. Check the material first. If the screwdriver doesn't stick to a magnet it's most likely made of titanium.
Using a Magnet
This method is the easiest in my opinion. You will need a strong magnet for it. If your magnet is small you will not be able to get a decent result, or it may take more time to complete the steps.
- Step 1: Take a magnet and cover it with a piece of soft material. You can take a piece of cloth, textile or paper for this. Other guides in the internet don’t tell you about this step but it is VERY IMPORTANT if your screwdriver has a cool looking chrome finish.
- Step 2: Take a screwdriver and start raking it across the magnet. Turn it a little bit every time you rake it. If the screwdriver is too large, you don’t need to magnetize full length. You can do this for the second part closest to the tip.
- Step 3: Repeat the above step 10 or 20 times. This should be enough.
After everything is done the magnetic field will last for a very long time, a year or two. You can repeat the steps to refresh the magnetic field anytime.
If you don’t cover the magnet with something soft you will damage the cool chrome finish on your tool. For some people, this may be not important at all. But if you are using a screwdriver not in the garage but for replacing batteries in your smartphone this may be important.
I personally don’t like to damage tools if it’s not necessary. And scratches, after you do this on an uncovered magnet, may look terrible.
Where to take a magnet?
If you have a magnetic parts tray in your garage you can use it for the purposes of this article. It has a strong enough magnet at the bottom. Moreover, it’s a very useful thing in a garage, and I absolutely recommend buying one if you don’t have it. It is cheap and very useful.
The reason to use a tray is also because it has a rubber cover on the magnet. This rubber cover will not let you to damage the chrome finish.
You can also take a magnet from an old subwoofer or car stereo speaker. In general, any magnet will be good.
Using a Special Magnetizer
There are special Magnetizers which can be bought on Amazon or in other stores. They are easy and comfortable to use and they allow both magnetizing and demagnetizing your screwdriver. Demagnetizing may be required for some situations and this tool can do it very fast.
This is a professional tool and it costs about 5 USD. I absolutely recommend purchasing it if you are an engineer and need to demagnetize your screwdriver often.
Battery Method
The second way of getting your screwdriver magnetized is using a battery. You will need a 6V or 9V battery and a piece of insulated wire (30 centimeters should be enough). The wire shouldn’t be too thick or thin: 0.5 – 0.8 mm diameter is good.
The wire must be insulated to create a magnetic field. If it’s not insulated at all, the result will not satisfy you.
The thinner the insulation is the better result you will get. An enamel-coated copper wire is the best for this. Copper has low electrical resistance.
- Step 1: Remove about 1 cm of insulation from both sides of your wire. If it is enamel-coated use sandpaper for this.
- Step 2: Wrap the wire tight around the screwdriver 15 -20 times. The wrap may start anywhere but it must end near the tip. If it’s necessary, use a sticky tape to fix the wire on its position.
- Step 3: Connect the ends of the wire to a battery. This will create a magnetic field and the job will be done.
- Step 4: wait for 30 – 50 seconds and disconnect wire from the battery. Don’t wait for a longer time. It’s not necessary. If the battery is stronger than 9 volts several seconds will be enough. The stronger the battery is the less time is required.
- Step 5: Check the screwdriver. If it’s not magnetized, repeat the above steps but with more lops of wire.
PAY ATTENTION: You don’t need a battery stronger than 9 Volts. If it’s stronger, use special insulated gloves in order to avoid electricity hit.
When to repeat?
The magnetic effect will last for a year or even longer, but the strength will be decreasing slowly. If you drop the screwdriver or hit things with it, the magnetic effect will disappear faster. You can repeat the procedure once again when you see that it is required.
As you can see the magnet method is much easier and requires less preparation. I personally like it more because I can repeat the process any time to refresh my screwdriver.
You need to login to add new comments.
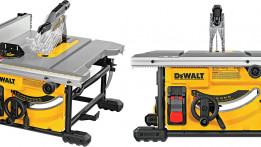
This DeWalt DWE7485 review will tell you the most important things about this 8-1/4 inch Compact Jobsite Table Saw. You will find out about its features and if it’s worth the money.
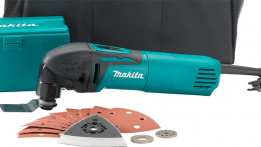
What to do if your Makita TM3010C stopped working? You have several options: first of all start with a warranty. Find out if your tool is under warranty and if yes, send it for repair.…
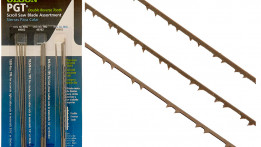
Olson Saw PG49802 Precision Ground Scroll Saw Blades can be used with different models of saws including DeWalt DW788, Delta 40-560 and others. They can cut different types of wood:…
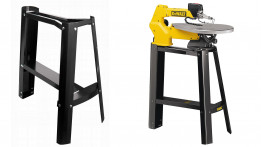
In this article, I want to review DeWalt DW7880 Scroll-Saw Stand. I will tell you about my whole experience of using this item. You will find out what are the sizes and if it stands…
In today’s article, I want to review the DeWalt DW788 20 IN. Variable-Speed Scroll Saw. This tool has over 500 votes on Amazon with 70% 5-star ratings. It’s one of the best scroll saws…

Comments ()